
Butterfly安装与配置

关联网站


Butterfly安装
穩定版【建議】
在你的 Hexo 根目錄裏
1 | git clone -b master https://github.com/jerryc127/hexo-theme-butterfly.git themes/butterfly |
測試版
測試版可能存在 bug,追求穩定的請安裝穩定版
如果想要安裝比較新的 dev 分支,可以
1 | git clone -b dev https://github.com/jerryc127/hexo-theme-butterfly.git themes/butterfly |
升級方法:在主題目錄下,運行 git pull
穩定版【建議】
在你的 Hexo 根目錄裏
1 | git clone -b master https://gitee.com/immyw/hexo-theme-butterfly.git themes/butterfly |
測試版
測試版可能存在Bugs,追求穩定的請安裝穩定版
如果想要安裝比較新的dev分支,可以
1 | git clone -b dev https://gitee.com/immyw/hexo-theme-butterfly.git themes/butterfly |
升級方法:在主題目錄下,運行 git pull
此方法只支持 Hexo 5.0.0 以上版本
通過 npm 安裝並不會在 themes 裏生成主題文件夾,而是在 node_modules 裏生成
在你的 Hexo 根目錄裏
1 | npm install hexo-theme-butterfly |
升級方法:在 Hexo 根目錄下,運行 npm update hexo-theme-butterfly
插件
Butterfly主题文档包含的插件
hexo-renderer-pug
Hexo 的 Pug 渲染器。
hexo-renderer-stylus
Hexo 的 Stylus 渲染器
先决条件:
- Hexo 3:>= 0.2
- Hexo 2:0.1.x
1 | npm install hexo-renderer-stylus --save |
您可以在 中配置此插件_config.yml。
1 | stylus: |
- compress - 压缩生成的CSS(默认值
false:) - 源映射
- comment - 将注释添加到
sourceMappingURL生成的 CSS 中(默认值true:) - inline - 使用 base64 格式的完整源文本内联源映射(默认值
false:) - sourceRoot -
sourceRoot生成的源映射的属性 - basePath - 源映射和所有源都是相对的基本路径(默认值
.:)
- comment - 将注释添加到
- 插件- Stylus 插件(默认
nib:)
设置手写笔变量
可以设置可在 Stylus 中使用的变量。设置变量的目的是避免直接修改Stylus代码,从而使主题更加通用
例如,代替硬编码:
1 | div |
您可以引用一个变量:
1 | div |
在主题的配置中,您可以定义此变量:
1 | moody_red: "#8B0001" |
(上面的“convert”函数在这里将字符串转换为实际的手写笔颜色)
您还可以在 main 中使用 theme_config 变量_config.yml:
1 | theme_config: |
可扩展性
该插件提供了一个过滤器stylus:renderer,允许您扩展它。当您无法在 Stylus 中执行某些操作时,请在 JavaScript 中定义它!
例如,定义一些全局变量:
1 | hexo.extend.filter.register('stylus:renderer', function(style) { |
将文件保存在“scripts/”文件夹中并照常运行 Hexo。
注意:更多JavaScript api,请参考stylus的文档。
hexo-generator-searchdb
文档链接:https://butterfly.js.org/posts/ceeb73f/#%E6%90%9C%E7%B4%A2
🔍 Hexo 的搜索数据生成器插件。
该插件用于生成搜索索引文件,其中包含文章的所有必要数据,您可以使用这些数据为博客编写本地搜索引擎。支持XML和JSON格式输出。
1 | npm install hexo-generator-searchdb |
你需要安裝 hexo-generator-searchdb 或者 hexo-generator-search,根據它的文檔去做相應配置
修改 主題配置文件
1 | # Local search |
| 參數 | 解釋 |
|---|---|
| enable | 是否开启本地搜索 |
| preload | 预加载,开启后,进入网页后会自动加载搜索文件。关闭时,只有点击搜索按钮后,才会加载搜索文件 |
| top_n_per_article | 匹配的文章结果,默认显示最开始的 1段结果 |
| unescape | 将 html 字符串解码为可读字符串 |
| CDN | 搜索文件的 CDN 地址(默认使用的本地链接) |
您可以在 root 中配置此插件_config.yml。所有参数都是可选的。
1 | search: |
路径- 文件路径。默认情况下是
search.xml.如果文件扩展名是.json,则输出格式将为 JSON。否则将导出 XML 格式文件。field
- 您要搜索的搜索范围,您可以选择:
- post(默认)- 仅涵盖您博客的所有帖子。
- 页面- 只会覆盖您博客的所有页面。
- 全部- 将涵盖您博客的所有帖子和页面。
content - 是否包含每篇文章的全部内容。如果
false,则生成的结果仅包含标题和其他元信息,而不包含正文。默认情况下是true.format
- 页面内容的形式,选项有:
- html(默认)- 原始 html 字符串被缩小。
- striptags - 原始 html 字符串被缩小,并删除所有标签。
- raw - 每个帖子或页面的降价文本。
常问问题
这个插件应该做什么?
该插件用于从 Hexo 博客生成 xml / json 文件,以提供搜索数据。
这个文件保存在哪里?
执行后,
hexo g您将在公共文件夹中获得生成的结果。
如何在我的 Hexo 博客中使用这个插件?
你有两个选择:
你不想自己编写搜索引擎。有许多主题使用此插件进行开箱即用的本地搜索。
您熟悉 JavaScript 并且想编写自己的搜索引擎。您可以根据模板代码
search.js自行实现一个。目前没有文档,但您可以在主题 NexT的源代码中找到它的用法。一般有3个步骤:
- 编写一个搜索视图。这是显示搜索表单和搜索结果的地方;
- 通过CDN加载
search.js脚本,例如:
LocalSearch中提供了一个类search.js,告诉浏览器如何抓取搜索数据并过滤掉我们正在搜索的内容;1. 编写一个[搜索脚本](https://github.com/next-theme/hexo-theme-next/blob/v8.8.0/source/js/third-party/search/local-search.js),利用上一个`LocalSearch`类。
hexo-wordcount
Hexo 字数统计插件
Butterfly文档地址:https://butterfly.js.org/posts/ceeb73f/#%E5%AD%97%E6%95%B8%E7%B5%B1%E8%A8%88
要为Butterfly配上字数统计特性, 你需要如下几个步骤:
打开 hexo 工作目录
2
3
or
yarn add hexo-wordcount修改 主题配置文件:
2
3
4
5
enable: true
post_wordcount: true
min2read: true
total_wordcount: true
安装
1 | yarn add hexo-wordcount |
用法
字数统计 WordCount
1 | wordcount(post.content) |
预计 Min2Read 的阅读时间长
1 | min2read(post.content) |
设置阅读速度 设置阅读速度:
1 | min2read(post.content, {cn: 300, en: 160}) |
总字数统计 TotalCount
1 | totalcount(site) |
帖子数:
1 | <span class="post-count">{{ wordcount(post.content) }}</span> |
发布分钟阅读:
1 | <span class="post-count">{{ min2read(post.content) }}</span> |
总数:
1 | <span class="post-count">{{ totalcount(site) }}</span> |
帖子数:
1 | <span class="post-count"><%= wordcount(post.content) %></span> |
发布分钟阅读:
1 | <span class="post-count"><%= min2read(post.content) %></span> |
总数:
1 | <span class="post-count"><%= totalcount(site) %></span> |
帖子数:
1 | span.post-count= wordcount(post.content) |
发布分钟阅读:
1 | span.post-count= min2read(post.content) |
总数:
1 | span.post-count= totalcount(site) |
已安装插件
hexo-butterfly-article-double-row
将hexo-theme-butterfly文章的布局更改为双栏
1 | npm i hexo-butterfly-article-double-row --save |
注意,一定要加 --save,不然本地预览的时候可能不会显示!!!
新增网站根目录_config 配置项 (不是主题的):
1 | YAML |
hexo-github-card
同类功能网站:https://lab.lepture.com/github-cards/
在您的 hexo 博客中显示 GitHub 配置文件和存储库的卡片。使用 Github-cards 实现
当我写一篇新的博客文章时,有时我想包含 GitHub 存储库或 GitHub 配置文件的信息,并且我希望它们在我的博客中看起来很好,而不仅仅是一个简单的链接。
目前,有一个名为hexo-github的 hexo 插件,它可以在您的博客中显示 GitHub 提交。但是,我觉得我并不需要显示特定的提交,而是需要显示更一般的信息,例如存储库的名称、其描述和作者。
幸运的是,有一个名为github-cards的存储库,它非常适合我的需要。因此,我实现了这个简单的插件,以便博主可以轻松地在 GitHub 上添加信息。
您可以通过阅读我的博客文章找到有关我如何创建插件的更多信息
1 | npm install --save hexo-github-card |
or
1 | yarn add hexo-github-card |
hexo-bilibili-card
一个Hexo插件,在你的文章中插入b站的视频卡片,样式模仿和借鉴自b站。A hexo plugin insert a bilibili card into your page or article.
1 | npm i hexo-bilibili-card --save |
由于 b 站图片地址的跨域限制,因此需要配置图片代理,目前未找到大陆地区较为稳定的服务,默认使用的 https://images.weserv.nl/?url=,部分地区受到了 DNS 污染及反应过慢。建议参考 rsstt-img-relay 自建服务。
Due to the CORS strategy of Bilibili, you need to configure an image proxy to get the image correctly. Unfortunately, we haven’t found any stable image proxy in China Mainland yet. The default image proxy is provided by https://images.weserv.nl/?url=, which has DNS pollution in some areas and the response is too slow. We suggest referring to rsstt-img-relay to build your image proxy instead.
1 | hexo_bilibili_card: |
In your config file, insert follow codes:
在你的 config 文件中插入以下片段
1 | {% bilicard your_video_id %} |
your_video_idis the avid or bvid in Bilibili.your_video_id是b站的bv号或av号。
then you will get the card in your page.
然后你就可以看见文章中的卡片了。
例子:
1 | {% bilicard BV1ZJ4m1W7Pw %} |

You can click here to see the preview website.
点击 这里 看预览哦\x7e
hexo-bilibili-bangumi
功能笔记鸡肋,暂时用不上。对于动漫二次元患者像是个宝藏工具。已安装,没什么乱用。
hexo 番剧页面插件,可选数据源:Bilibili, Bangumi
为 Hexo 添加哔哩哔哩/Bangumi追番/追剧页面,参考自hexo-douban.
1 | npm install hexo-bilibili-bangumi --save |
将下面的配置写入站点的配置文件 _config.yml 里(不是主题的配置文件).
1 | bangumi: # 追番设置 |
带*为必填选项!
- enable: 是否启用
- source: 数据源,仅支持追番,追剧仅支持哔哩哔哩源。
bili: 哔哩哔哩源,bangumi: Bangumi源(bangumi.tv),bgm: Bangumi源(bgm.tv) - bgmInfoApi: 获取Bangumi番剧信息时使用的Api,仅使用Bangumi源时此选项生效。
bgmApi: Bangumi Api,bgmSub: Bangumi-Subject - proxy: 代理设置,仅在使用支持
bgm源追番时生效。默认false - path: 页面路径,默认
bangumis/index.html,cinemas/index.html - vmid: 哔哩哔哩的
vmid(uid)如何获取?或Bangumi的用户id如何获取? - title: 该页面的标题
- quote: 写在页面开头的一段话,支持 html 语法,可留空。
- show: 初始显示页面:
0: 想看,1: 在看,2: 看过,默认为1 - lazyload: 是否启用图片懒加载,如果与主题的懒加载冲突请关闭,默认
true - srcValue: 设置封面图的默认
src值,__image__为封面链接,__loading__为loading图片链接,lazyload选项为false时此选项生效 - lazyloadAttrName: 设置封面图的属性与属性值, 例
lazyloadAttrName: 'data-src=__image__'代表为img元素添加data-src属性, 其值为图片链接,lazyload选项为false时此选项生效 - loading: 图片加载完成前的 loading 图片,需启用图片懒加载
- metaColor: meta 部分(简介上方)字体颜色(十六进制的颜色代码需要添加引号:
metaColor: '#FFFFFF') - color: 简介字体颜色
- webp: 番剧封面使用
webp格式(此格式在safari浏览器下不显示,但是图片大小可以缩小 100 倍左右,仅支持哔哩哔哩源), 默认true - progress: 获取番剧数据时是否显示进度条,默认
true - extraOrder: 手动添加的番剧/追剧数据是否优先显示,
1为优先,其它为不优先 - showMyComment: 使用
bgm源时显示自己的评价及评论,默认false - pagination: 分页优化,只将第一页的数据渲染到
html文件中,其余数据将通过异步请求加载,避免番剧过多时html文件过大导致页面加载缓慢,建议番剧较多时使用,默认false - order: 排序,支持
latest(默认,按添加时间排序),score(评分升序),-score(评分降序) - extra_options: 此配置会扩展到Hexo
page变量中
使用
在
hexo generate或hexo deploy之前使用hexo bangumi -u命令更新追番数据,使用hexo cinema -u命令更新追剧数据!删除数据命令:
hexo bangumi -d/hexo cinema -dnpx hexo new page bilibili配置文件参数说明 path: /bilibili/index.html vmid: 27645545441
1
2
3
4
5
6
```yml
新建页面yml参数设置
title: bilibili
date: 2024-04-10 17:39:29
type: "bangumis"
获取 Bilibili uid
登录哔哩哔哩后前往https://space.bilibili.com/页面,网址最后的一串数字就是 uid
需要将追番列表设置为公开!
获取 Bangumi id
登录Bangumi后打开控制台(Ctrl+Shift+J),输入CHOBITS_UID回车,下面会输出id
示例

手动添加番剧/追剧数据
因为某些番剧在哔哩哔哩上没有,但是又想在hexo中展示,怎么办呢?现在支持手动添加番剧数据了!
在
sources/_data/目录下新建文件,命名为extra_bangumis.json(追番数据)或extra_cinemas.json(追剧数据) ,并添加以如下内容:
2
3
4
5
6
7
8
9
10
11
12
13
14
15
16
17
18
"watchedExtra": [
{
"title": "缘之空",
"type": "番剧",
"area": "日本",
"cover": "https://cdn.jsdelivr.net/gh/mmdjiji/bangumis@main/Yosuga-no-Sora/cover.jpg",
"totalCount": "全12话",
"id": 0,
"follow": "不可用",
"view": "不可用",
"danmaku": "不可用",
"coin": "不可用",
"score": "不可用",
"des": "远离都市的田园小镇,奥木染。春日野悠带着妹妹穹,来到了这座城镇。坐落在这里的是,儿时暑假经常造访的充满回忆的已故祖父的家。双亲因意外事故而丧生,变得无依无靠..."
}
]
}
title是番剧的标题,cover是封面图链接,des是简介,上述字段均根据需要修改。另外除了
watchedExtra数组,还可以在后面添加新的数组,可用数组名如下:
可用数组名 含义 wantWatchExtra 想看 watchingExtra 在看 watchedExtra 看过 需要注意,在两个数组之间需要用
,分隔。
多主题兼容
- Fork此项目并克隆到本地;
- 进入项目目录并安装依赖
npm install;- 在
src/lib/templates/theme/目录内添加主题.css文件(例:butterfly.css);- 在
主题.css文件内添加主题兼容样式表;- 运行命令
npm run build;- 提交PR.
hexo-douban-card
在hexo文章中插入豆瓣读书,豆瓣电影,豆瓣音乐组件
一个 HEXO 插件,实现了用 HEXO 语法来在博客中插入一个豆瓣读书卡片的功能,现在实现了读书和电影两个板块
然后使用以下语法
2
3
{% douban book 30376420 %}
{% douban music 35099703 %}参数阐述
- 第一项
douban代表插件名- 第二项可选:
movie,book,music- 第三项请填入对应的
id例如:
填写subject后面的那串数字就好

插件配置
需要在 _config.yml 中配置 doubanCard,但这并不是必选项,如果你遇到了某些需要登录的豆瓣网址,那么请填写 cookie,如果你遇到图片代理失效的问题,请自行替换 imgProxy。未经验证的代理网址可以参考这个 issue:图像加速服务weserv地址被reset了,不能显示图片
1 | doubanCard: |

hexo-douban
💿 一个 Hexo 插件,可以帮助您生成豆瓣图书、电影、音乐和游戏的内容。
一个在 Hexo 页面中嵌入豆瓣个人主页的小插件.
原理
hexo-douban 目前升级到了 2.x 版本,将原先由插件客户端自行获取数据的逻辑抽到了一个隐藏的服务端中进行,以统一解决数据获取、数据缓存、风控对抗等问题,提高页面生成的成功率和效率。
1 | npm install hexo-douban --save |
将下面的配置写入站点的配置文件 _config.yml 里(不是主题的配置文件).
1 | douban: |
- id: 你的豆瓣ID(纯数字格式,不是自定义的域名)。获取方法可以参考怎样获取豆瓣的数字 ID ?
- builtin: 是否将
hexo douban命令默认嵌入进hexo g、hexo s,使其自动执行hexo douban命令。默认关闭。 - item_per_page: 每页展示的条目数,默认 10 。
- meta_max_line: 每个条目展示的详细信息的最大行数,超过该行数则会以 “…” 省略,默认 4 。
- customize_layout: 自定义布局文件。默认值为 page 。无特别需要,留空即可。若配置为
abcd,则表示指定//theme/hexo-theme/layout/abcd.ejs文件渲染豆瓣页面。 - path: 生成页面后的路径,默认生成在 //yourblog/books/index.html 等下面。如需自定义路径,则可以修改这里。
- title: 该页面的标题。
- quote: 写在页面开头的一段话,支持html语法。
- timeout: 爬取数据的超时时间,默认是 10000ms ,如果在使用时发现报了超时的错(ETIMEOUT)可以把这个数据设置的大一点。
- option: 该页面额外的 Front-matter 配置,参考Hexo 文档。无特别需要,留空即可。
如果只想显示某一个页面(比如movie),那就把其他的配置项注释掉即可。
使用
展示帮助文档
2
3
4
5
6
7
8
9
10
11
Usage: hexo douban
Description:
Generate pages from douban
Options:
-b, --books Generate douban books only
-g, --games Generate douban games only
-m, --movies Generate douban movies only
-s, --songs Generate douban songs only
主动生成豆瓣页面
2
3
4
5
6
7
8
9
10
INFO Start processing
INFO 0 (wish), 0 (do),0 (collect) game loaded in 729 ms
INFO 0 (wish), 0 (do),20 (collect) song loaded in 761 ms
INFO 2 (wish), 0 (do),136 (collect) book loaded in 940 ms
INFO 30 (wish), 0 (do),6105 (collect) movie loaded in 4129 ms
INFO Generated: books/index.html
INFO Generated: movies/index.html
INFO Generated: games/index.html
INFO Generated: songs/index.html如果不加参数,那么默认参数为
-bgms。当然,前提是配置文件中均有这些类型的配置。需要注意的是,通常大家都喜欢用
hexo d来作为hexo deploy命令的简化,但是当安装了hexo douban之后,就不能用hexo d了,因为hexo douban跟hexo deploy的前缀都是hexo d。如果 builtin:false 时,执行 hexo g 之后发现将 douban 生成的页面删除了:
2
3
4
5
6
INFO Files loaded in 343 ms
INFO Deleted: games/index.html
INFO Deleted: books/index.html
INFO Deleted: movies/index.html
INFO Deleted: songs/index.html那么重新执行 hexo clean 一下即可(原因是 db.json 的数据缓存)。
第一次使用 hexo douban 时,后台会异步进行数据获取,一般需要等待一段时间(后台访问你的标记页面)才能查到数据。顺利情况下,平均一个页面会花10s。
例如如果你有 150 个想读、150个已读、150个在读的图书,每页15条,则共需要翻30页。那么大约需要等待 30*10/60=5 分钟。如果长时间没有更新(一天以上),请及时提 issue 反馈。
后续如果你的豆瓣数据更新了,hexo douban 同样也会自动进行更新(同样需要等待一段时间才会查到更新数据),不过出于安全考虑,一个用户id每半小时至多只会同步一次。
由于豆瓣本身深分页的 RT 过高(上万条目的翻页 RT 会到 15s 到 60s),为了防止系统同步压力过大,每个用户的每一类条目最多只会同步 1w 条。
升级
我会不定期更新一些功能或者修改一些Bug,所以如果想使用最新的特性,可以用下面的方法来更新:
- 修改 package.json 内 hexo-douban 的版本号至最新
- 重新安装最新版本
npm install hexo-douban --save或者使用
npm install hexo-douban --update --save直接更新。
显示
如果上面的配置和操作都没问题,就可以在生成站点之后打开
//yourblog/books和//yourblog/movies,//yourblog/games, 来查看结果。
菜单
如果上面的显示没有问题就可以在主题的配置文件
_config.yml里添加如下配置来为这些页面添加菜单链接.
2
3
4
5
6
7
Home: /
Archives: /archives
Books: /books #This is your books page
Movies: /movies #This is your movies page
Games: /games #This is your games page
Songs: /songs #This is your songs page
通用环境
如果有非 hexo 环境的部署需求,则可以考虑以引入静态资源的方式接入 idouban 。
接口
如果仅仅想对自己的豆瓣数据进行备份,可以尝试使用下面的接口,复用后端维护的数据提取服务 mouban :
2
3
4
5
6
7
8
9
10
11
12
13
14
15
16
17
18
19
20
21
22
23
24
25
26
27
28
29
30
31
32
33
34
35
36
37
# 用户录入/更新
https://mouban.mythsman.com/guest/check_user?id={your_douban_id}
# 查询用户的读书评论
https://mouban.mythsman.com/guest/user_book?id={your_douban_id}&action=wish
https://mouban.mythsman.com/guest/user_book?id={your_douban_id}&action=do
https://mouban.mythsman.com/guest/user_book?id={your_douban_id}&action=collect
# 查询用户的电影评论
https://mouban.mythsman.com/guest/user_movie?id={your_douban_id}&action=wish
https://mouban.mythsman.com/guest/user_movie?id={your_douban_id}&action=do
https://mouban.mythsman.com/guest/user_movie?id={your_douban_id}&action=collect
# 查询用户的游戏评论
https://mouban.mythsman.com/guest/user_game?id={your_douban_id}&action=wish
https://mouban.mythsman.com/guest/user_game?id={your_douban_id}&action=do
https://mouban.mythsman.com/guest/user_game?id={your_douban_id}&action=collect
# 查询用户的音乐评论
https://mouban.mythsman.com/guest/user_song?id={your_douban_id}&action=wish
https://mouban.mythsman.com/guest/user_song?id={your_douban_id}&action=do
https://mouban.mythsman.com/guest/user_song?id={your_douban_id}&action=collect
hexon
插件有点小问题。在初始化start的时候,无论设置的用户名是什么都无效,首次登录用户名必须是Administration。
❔ 它是如何运作的?
Hexon 是带有 git 的 hexo GUI,可以为您运行命令和管理内容。
⭐️特点
- 帖子和页面管理
- 头条模板
- 使用图像
安装前
确保您的git、hexo和Node.js工作流程正常。 Hexon 只为这些命令提供了 GUI,但没有实现它们。
安装
1 | git clone https://github.com/gethexon/hexon --depth 1 |
卸载
只需删除刚刚克隆的文件夹即可
1 | rm -rf hexon |
开始
对于普通 Node.js:
1 | pnpm start |
使用pm2实现更好的 devOps
1 | pnpm prd |
更新
只需卸载旧的并安装新的即可。
命令
pnpm run setup: 安装和配置pnpm start:以节点开始六边形pnpm prd:用 pm2 启动六边形pnpm resetpwd: 重设密码pnpm script:管理自定义脚本
您可以在 hexo 博客文件夹中将 hexon 命令替换为您自己的 bash 脚本。
例如修改git sync脚本
- 将你的脚本写在
<hexo-blog-path>/git_sync.sh - 跑步
pnpm script - 选择
git sync - 将脚本设置为
bash ./git_sync.sh
👌🏻常见问题解答
hexo-bridge
由 hexo 提供支持的网站指挥中心。
- 帖子和页面编辑器
- 文件管理器
- 网站设置编辑器
- 主题和插件发现
1 | npm i --save hexo-bridge |


hexo-blog-encrypt
hexo 博客加密
这是什么
首先,hexo 中最好的后期加密插件。(但是其他插件呢?)- 它适合那些写了一篇文章但不希望每个人都阅读它的人。因此,某些页面需要密码才能访问这些加密的帖子。
- 加密在 wordpress、emlog 或其他博客系统(hexo 除外)上很简单。 :(
- 所以现在是“hexo-blog-encrypt”的时候了。
特征
- 输入正确的密码后,您就可以访问加密的帖子,并且密码会在本地记住。再次按下该按钮,存储的密码将被删除。如果帖子中有脚本,一旦帖子被解密,它们就会被执行。
- 支持预设标签指定密码。
- 所有功能均由原生API提供。我们在 Node.js 中使用Crypto ,并在浏览器中使用Web Crypto API。
- PBKDF2、SHA256用于派生密钥,我们使用AES256-CBC来加密和解密数据,我们还使用HMAC来验证消息认证码,以确保帖子被良好解密且未被修改。
- Promise被广泛使用,是为了保证我们的主程序是异步的,这样进程被阻塞的机会就很少,体验也会更加流畅。
- 支持模板主题,您可以使用 [
default,blink,flip,shrink,surge,up,wave,xray] 设置您的模板主题,并在线查看。- 过时的浏览器可能无法正常工作。在这种情况下,请升级您的浏览器。
1 | npm install --save hexo-blog-encrypt |
快速开始
- 将“密码”值添加到帖子的前面,例如:
2
3
4
5
title: Hello World
date: 2016-03-30 21:18:02
password: hello
- 然后使用
hexo clean && hexo g && hexo s在本地查看您的加密帖子。
密码优先级
帖子的头条 > 加密标签
高级设置
在帖子的前面
2
3
4
5
6
7
8
9
10
11
title: Hello World
tags:
- encryptAsDiary
date: 2016-03-30 21:12:21
password: mikemessi
abstract: Here's something encrypted, password is required to continue reading.
message: Hey, password is required here.
wrong_pass_message: Oh, this is an invalid password. Check and try again, please.
wrong_hash_message: Oh, these decrypted content cannot be verified, but you can still have a look.
在
_config.yml例子
2
3
4
5
6
7
8
9
encrypt: # hexo-blog-encrypt
abstract: Here's something encrypted, password is required to continue reading.
message: Hey, password is required here.
tags:
- {name: encryptAsDiary, password: passwordA}
- {name: encryptAsTips, password: passwordB}
wrong_pass_message: Oh, this is an invalid password. Check and try again, please.
wrong_hash_message: Oh, these decrypted content cannot be verified, but you can still have a look.禁用标签加密
只需将
password前面的属性设置为 即可""。例子:
2
3
4
5
6
7
8
9
title: Callback Test
date: 2019-12-21 11:54:07
tags:
- A Tag should be encrypted
password: ""
Use a "" to disable tag encryption.配置优先级
帖子的头条 >
_config.yml(在根目录下) > 默认
请参阅演示页面,**所有密码均为hello**。
关于回调
在某些博客中,某些元素解密后可能无法正常显示。这是一个已知的问题。目前的解决办法是查看自己博客中的代码,了解onload事件发生时调用了哪些函数。然后将这些代码写在帖子的末尾。例如:
1 |
|
演示:回调示例。
hexo-butterfly-charts
将 hexo poats、类别和标签的统计数据呈现到图表中。
灵感来自 HEXO 主题 matery.
- 包含
- 发布统计
- 发布日历
- 标签统计
- 分类统计
- 分类雷达图
1 | npm install hexo-butterfly-charts --save |
修改 Butterfly config 配置
1 | #see https://www.npmjs.com/package/hexo-butterfly-charts |
详细代码请看扩展举例
具体修改参数参照1
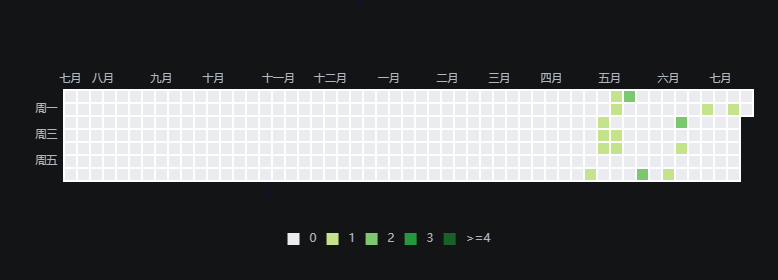
发布日历
1
<div id="posts-calendar" class="js-pjax"></div>

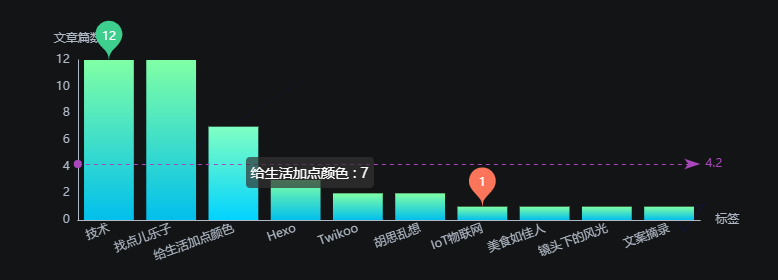
发布统计
1
<div id="posts-chart" class="js-pjax"></div>

标签统计
1
<div id="tags-chart" data-length="10" class="js-pjax"></div>

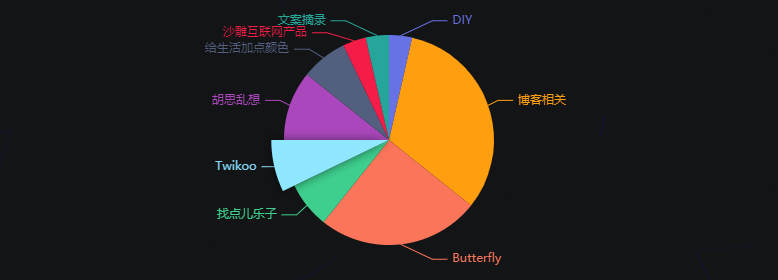
分类统计(无标题)/分类雷达图(无标题)
1
<div id="categories-chart" class="js-pjax"></div>

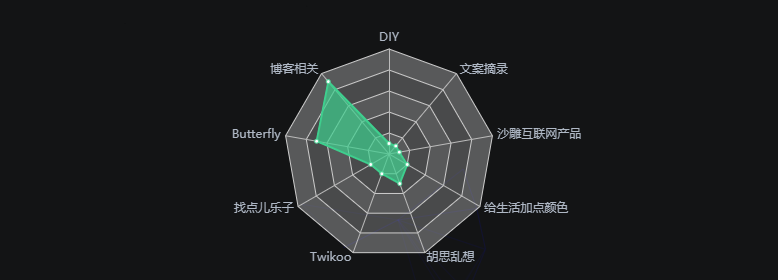
分类雷达图(无标题)
1
<div id="categories-radar" class="js-pjax"></div>

点击查看暗色模式截图
- 发布日历
- 发布统计

- 标签统计
- 分类统计(无标题)/分类雷达图(无标题)
- 分类雷达图(无标题)
-–
hexo-generator-readme-file
Hexo plugin, generate a README.md file contains all of blogs posts link.Hexo 插件,可以生成一个包含所有的文章链接的README.md文件
generate a
README.mdfile contains all of blog posts link.为你的文章生成一个
README.md文件,里面包含了所有的文章链接。
相关hexo插件
- hexo-generator-issues:将您的 hexo 帖子发布到 github issues。将个人文章发布到github的指定仓库下,每一篇文章作为一个问题。
- hexo-generator-readme-file:生成一个
README.md包含所有博客文章链接的文件。为你的文章生成一个README.md文件,里面包含了所有的文章链接。- hexo-filter-link-post:将 markdown 文件中的相对帖子链接转移到帖子链接。将文件里的通过相对路径引用的markdown文件转为对应文章的链接。

1 | npm install hexo-generator-readme-file --save |
在配置文件(_config.yml)中添加以下内容:
1 | readmeConfig: |
hexo-markmap
一个 hexo 插件通过 markmap 在你的 hexo 博客中插入思维导图。在hexo博客中插入思维导图。
通过 markmap 在你的 hexo 博客中插入思维导图。
从现在开始,所有语法,如 HTML 代码、链接、内联代码、markdown KaTeX 和 Codeblocks 都可以使用。
代码块仍然存在一些问题,可能会引发一些错误。更多预览请见我的博客。
1 | pnpm add hexo-markmap -D |
1 | npm install hexo-markmap --save-dev |
1 | yarn add hexo-markmap --dev |
用法
1 | {% markmap height [depth] %} |
选项
height:思维导图画布高度depth:可选,指定时自动折叠级别大于的节点depth
1 | {% markmap 400px 2 %} |
hexo-pro
设置账号密码后无法登录,后经过测试。发现需要执行npm install和npm update
hexo博客后台管理
slogen:Hexo pro 一个属于你自己的博客后台
修改这个项目的原因是自己用Hexo框架搭建的个人博客,Hexo-admin插件已经很久没有人维护了,随着博客量的不断增加一些体验方面不太好,不支持front-matter的,一开始是想用SpringBoot或者Go Hertz等后台框架来搭建后台服务,nginx托管静态文件,后台服务维护markdown文件,通过hexo命令行渲染更新静态文件,但是想了其实反而更复杂了,也看过github上开源的Hexo博客管理系统比如Qexo,感觉配置起来有点麻烦,还是直接安装hexo插件来的方便,不会引入更多的东西。
我之前学的基本上都是头痛,前端属于入门的水平,如果有大佬对这个项目感兴趣欢迎一起来贡献,目前这个版本能够满足慢慢日常编写发布博客的需求,后续会迭代遍历路过的朋友、个人博客兴趣点个star支持下吧谢谢~~
配置登陆账户及密码
需要在hexo的_config.yml中增加以下配置来使用账户密码登陆后台,不配置后台会直接登陆。配置后使用jwt来保护后台访问的接口
1 | hexo_pro: |
Hexo pro 插件支持 Hexo 3.x
截图


特性
- 支持创建编写的博客
- 支持创建编写页面
- 支持图片粘贴上传
- 支持post、page的front-matter编辑
这个插件其实是采用前远程分离的方式编写的,这个插件在hexo的服务器上添加了中间件,其实是作为桌面,代理预留的静态文件,静态文件存放在www文件夹存放的。请看另外一个仓库:https://github.com/wuzheng228/hexo-pro-client ps:这里你可能会问,为什么不把客户端和仓库的代码放在同一个仓库里,因为hexo-pro-客户端使用了Arco-design pro作为脚手架放置在多级文件夹中启动dev服务器会有问题
hexo-tag-embed
警告
请不要在低于 hexo 的情况下使用此插件
v7.0.0。
笔记
1 | npm i hexo-tag-embed |
要嵌入 Gist 片段:
1 | {% gist gist_id [filename] %} |
要嵌入 jsFiddle 片段:
1 | {% jsfiddle shorttag [tabs] [skin] [width] [height] %} |
插入响应式或指定尺寸的 Vimeo 视频。
1 | {% vimeo video_id [width] [height] %} |
插入 YouTube 视频。
1 | {% youtube video_id [type] [cookie] %} |
嵌入视频
1 | {% youtube lJIrF4YjHfQ %} |
嵌入播放列表
1 | {% youtube PL9hW1uS6HUfscJ9DHkOSoOX45MjXduUxo 'playlist' %} |
启用隐私增强模式
此模式下不使用 YouTube 的 cookie。
1 | {% youtube lJIrF4YjHfQ false %} |
hexo-tag-collapse-spoiler
它将隐藏您的内容,并通过按钮、链接或卡片将提示放置在顶部
1 | npm install hexo-tag-collapse-spoiler --save |
1 | {% collapse(btn|link|card) HINT_SHOW HINT_HIDE %} |
在全局_config.yml:/在站点的配置文件_config.yml里
1 | collapse: |

对应标签 / 代码
1 | {% collapsebtn "Click to show" "Click to hide" %} |
hexo-tag-wikipedia
适用于您的 Hexo 帖子的 Wikipedia 标签插件
一个将 Wikipedia 内容嵌入到 Hexo 帖子中的插件。
目前,它仅支持显示 Wiki 摘录( 之前的第一部分
Table of Contents)。
1 | npm i hexo-tag-wikipedia --save |
或者
1 | yarn add hexo-tag-wikipedia |
1 | {% wikipedia title:GitHub wikiButton:true %} |

可用参数
| 范围 | 描述 |
|---|---|
title:<wiki_title> |
例如,wiki URL https://en.wikipedia.org/wiki/Star_Wars,它是“Star_Wars” |
wikiButton:<true> |
是否显示维基百科页面链接。默认为false |
lang:<code> |
维基页面语言代码。en, fr, ja… 默认为en |
sentences:<number> |
如果指定,则限制要显示的句子数量。仅接受 1 到 10 之间的值。省略显示完整摘录 |
hexo-tag-map
给你的 Hexo 文章插入交互式地图吧!
给你的 Hexo 文章插入交互式地图吧!支持GoogleMap、高德地图、百度地图、Geoq地图、openstreetMap常规地图+卫星地图+卫星标注地图!一个强大的地图插件。
Insert an interactive map into your Hexo article! Support GoogleMap, Gaode map, Baidu map, Geoq map, openstreetMap regular map + satellite map + satellite annotated map! A powerful map plugin.
- author: guole
- https://blog.guole.fun/
- license: Apache-2.0
- https://github.com/kuole-o/hexo-tag-map/blob/main/LICENSE
- Tutorials:https://blog.guole.fun/posts/41887/
特性
- [混合地图]你将获得一个混合切换GoogleMap、高德地图、Geoq地图,常规地图+卫星地图+卫星标注地图共7个图层的地图
- [GoogleMap]你还将获得一个单独的谷歌地图+谷歌卫星地图
- [高德地图]你还将获得一个单独的高德地图+高德卫星地图+高德卫星标注地图
- [百度地图]你还将获得一个单独的百度地图+百度卫星地图+百度卫星标注地图
- [Geoq地图]你还将获得一个单独的Geoq地图+5种显示风格
- [openstreetMap]你还将获得一个单独的openstreetMap常规地图
- 支持标记点提示文本
- 支持各个地图缩放等级配置+经纬度配置+地图容器宽高配置+默认展示地图类型配置
- 用法超级简单
- Butterfly已验证,其他Hexo主题,欢迎体验
1 | npm install hexo-tag-map --save |
1 | 插入一个混合地图的示例: {% map %} |
hexo-generator-index-custom
支持置顶与隐藏文章的 Hexo 首页生成器插件。在官方的首页生成器的基础上添加了使用 top 置顶文章和 hide 隐藏文章的功能。参考
1 | npm uninstall hexo-generator-index |
将以下部分添加或修改到您的根 _config.yml 文件
1 | index_generator: |
path
:博客索引页的根路径。
- 默认: ””
per_page
:每页显示的帖子。
- 默认值:
config.per_page按照官方 Hexo 文档(如果存在)中的指定,否则10 0禁用分页
- 默认值:
order_by
:发布订单。
- 默认值:日期降序
pagination_dir
:URL 格式。
- 默认值:“页面”
awesome-page使第二页及以后的 URL 以“awesome-page/”结尾。
帖子Front-mattersticky中的或参数将用于将帖子固定到索引页的顶部。较高(或)意味着它将排名第一。top``sticky``top
您还可以使用sticky: true或top: true将帖子固定到索引页面的顶部。
1 |
|
1 |
|
帖子 Front-matter 中的参数hide将用于在索引页中隐藏帖子。
1 |
|
鸡肋插件
hexo-github-repo-tag
该插件工作十分不稳定,原因不明。
GitHub 存储库的简单而美观的标签。
如果直接使用安装会有很大概率出现404报错!
推荐保存到自己的仓库
2
在这个命令中,替换 branch-name 为你分叉后的分支名称。
1 | npm i hexo-github-repo-tag --save |
1 | # Use this in your Markdown article |

hexo-tag-bilibili
该插件不能正常工作,好像是由于版权原因无法正常播放。
在 Hexo 帖子/页面中嵌入 bilibili 视频
这是一个Hexo标签插件,用于 在帖子/页面中嵌入Bilibili视频
1 | npm install --save hexo-tag-bilibili |
完整的标签格式如下:
2
3
or
{% bilibili [av_id] [page] %}例子:
配置
您可以在主 _config.yml 中配置类型、自动播放和大小:
配置示例:
2
3
width: 452
height: 544
风格
视频剪辑由带有 class 的 div 包裹
bili_video。您可以在主题的 css 文件中修改它。
hexo-tag-bilibili-bangumi
该插件貌似需要安装后端支持,没仔细研读。感觉用不上,全是什么二次元!!
一个专为 Hexo 设计的基于 Bilibili-Bangumi-JS 的 Bilibili 追番进度展示插件。
1 | npm install hexo-tag-bilibili-bangumi --save |
用法
在需要插入追番进度的文章(post)或独立页面(page)中,使用如下标签即可插入。
其中
key_n=value_n的键值对表示一个设置项及其对应的值,目前支持的设置项有:
apiUrl- (必填)设置后端域名,包括https://和末尾的/api(后端的安装请参考这里)。vmid- (必填)设置 Bilibili UID,可在个人空间中查看。示例:
进阶
在站点的
config.yml中,可以对本插件进行更加高级的设置。
2
3
4
# (可选)设置静态资源的默认存放路径(因主题而异)
js_path: /assets/js/
css_path: /assets/css/
hexo-tag-douban
该插件不能正常工作,网络错误不能正常加载。
Hexo tag for Douban.
1 | // hexo root path |
1 | // xxx-post.md |

hexo-html-syncer
测试过比较鸡肋,功能有点过时。加载不了图片,相较之下还是用onenote更好些。
hexo 控制台命令将 html 转换为发布…
1 | npm install hexo-html-syncer --save |
在hexo博客目录下:
1 | $ hexo syncer article_url_address |
hexo-encrypt
已经好多年没更新了,相较之下已经使用hexo-blog-encrypt.
加密帖子内容
- 使用 AES 加密一篇帖子内容
- 使用七牛私人空间作为img仓库(如果您想使用此功能,您需要先获得七牛帐户,搜索google寻求帮助)
- 将本地img编码为base64类型,然后将其内联到html中
1 | npm install hexo-encrypt |
在hexo根目录中,编辑package.json,在依赖范围中添加以下代码
1 | "hexo-encrypt": "^0.2.0", |
配置加密密码
在 _config.yml 中添加以下代码,注意,所有选项都是可选的,这意味着如果您不想使用此功能,您可以放弃所有选项
2
3
4
5
6
7
8
9
10
11
encrypt:
pwdfile: encrypt_password # this store the password in a file, the whole content of this file will be regarded as the password
#password: 123456 # this set password here
replace_all_url: true # this will replace img url in all posts
base_url: http://you img base url/ # this will connect with you img url in you post, except full url(start with http://)
qiniu_ak: your qiniu access key
qiniu_sk: your qiniu secrect key
img_url_ttl: 3600 # 3600 second, the ttl for qiniu img url
type: qiniu # or base64, if base64, the base_url, qiniu_ak, qiniu_sk and img_url_ttl is unnecessary
template: 'user defined decrpyt ui template' # optional, it's html template include html and js. in js, you should call doDecrypt(password, onErrorCallbackFunc) with you password对于模板,下面是一个示例:
2
3
4
5
6
7
8
9
10
11
12
13
<input type="submit" value="decrypt" onclick="decrypt()" style=" width: 58px; height: 34px; border-radius: 5px; background-color: white; border-style: solid; color: currentColor; ">
<div id="enc_error" style=" display: inline-block; color: #d84527; font: large; "></div>
<script>
var onError = function(error) {
$("#enc_error")[0].innerHTML = "password error!";
};
function decrypt() {
var passwd = $("#enc_passwd input")[0].value;
console.log(passwd);
doDecrypt(passwd, onError);
}
</script>'
配置帖子
在帖子标题中添加以下代码以指示该帖子的内容应该加密。注意,所有选项都是可选的,这意味着如果您不想使用此功能,可以放弃所有选项
2
3
4
5
enc_replace_url: true # this indicate wether the plugin should replace the img url in this post, this option has a higher priority than `replace_all_url` in _config.yml
enc_pwd: 123456 # this is the way to set encrypt password for this post
enc_img_type: qiniu # or base64
enc_template: 'user defined decrpyt ui template' # same as template in _config.yml but has a higher priority然后运行
hexo g,hexo s打开加密帖子,你会发现,页面要求你输入密码。
更多设置:https://github.com/edolphin-ydf/hexo-encrypt#rule-for-encrypt-content
hexo-auto-tag
会报错443,不能用。
使用GPT-3自动为Hexo文章添加标签
借助 GPT-3 的强大功能,根据帖子的内容自动为其分配相关的预定义标签。
使用 GPT-3 的强大功能,根据文章内容自动为您的文章分配相关的预定义标签。 中文文档
1 | npm install hexo-auto-tag |
- 将以下内容添加到 Hexo 站点的
_config.yml文件中:
1 | auto_tag: |
您可以从此处获取您的 API 密钥。可能需要付费计划才能使用 API。然而,为 200 个帖子分配 50 个标签的成本极低,不到 0.1 美元。
- 准备好生成站点时运行以下命令:
1 | hexo clean && hexo generate |
确保同时运行hexo clean和hexo generate.
hexo-breadcrumb
会报错,不能用。貌似不能应用于butterfly主题或者我不知道代码的正确放置方法。
为 Hexo 生成面包屑
一个 Hexo 插件,用于为帖子和页面布局生成面包屑导航。
- 与帖子和页面布局兼容。
- 设置主页的自定义标题。
- 自定义分隔符和样式。
- 具有 ARIA 导航属性的无障碍导航。
在_config.yml文件中,指定面包屑设置,如下所示:
1 | breadcrumb: |
与 Hexo 主题集成
将以下代码片段添加到布局文件中以显示面包屑。
1 | <%- page.breadcrumb %> |
hexo-notify
该插件已经过时没人维护被弃用了。
Hexo 的通知插件。
这个hexo插件发送桌面通知。
它依赖于https://github.com/mikaelbr/node-notifier,能够发送在 Windows 和 Mac 上很好地显示的操作系统通知。
1 | npm install hexo-notify --save |
hexo-plugin-readmore
不知道怎么用,说明不详,莫名其妙。
Hexo 整合 OpenWrite 平台的 readmore 插件,实现博客的每一篇文章自动增加阅读更多效果,关注公众号后方可解锁全站文章,从而实现博客流量导流到微信公众号粉丝目的.
- 运行
npm install命令安装到本地项目
1 | $ npm install hexo-plugin-readmore --save |
- 运行
hexo generate命令构建本地项目或者hexo server启动本地服务.
1 | $ hexo generate |
或者
1 | $ hexo server |
在 _config.yml 配置文件中,配置 readmore 插件相关信息,详情见 OpenWrite 微信公众号增长神器 “ReadMore” 简介.
1 | plugins: |
注意: 前往 OpenWrite 后台申请开通
readmore功能后,一定要替换成自己的相关配置!
其中,配置参数含义如下:
blogId: [必选]OpenWrite 后台申请的博客唯一标识,例如:15702-1569305559839-744name: [必选]OpenWrite 后台申请的博客名称,例如:雪之梦技术驿站qrcode: [必选]OpenWrite 后台申请的微信公众号二维码,例如:https://snowdreams1006.github.io/snowdreams1006-wechat-public.jpegkeyword: [必选]OpenWrite 后台申请的微信公众号后台回复关键字,例如:vip

采用了同功能的hexo-tag-embed插件,这个插件好久没更新所以弃用。
Hexo 标签插件可嵌入 Youtube 视频,该视频可根据您的响应式布局自动调整大小
1 | npm install hexo-tag-youtube-responsive --save |
嵌入视频
2
{% endyoutuber %}例如
2
{% endyoutuber %}
嵌入播放列表
2
{% endyoutuber %}例如
2
{% endyoutuber %}请注意,您需要在播放列表 ID 前面添加字母 PL,如上所示
嵌入查询的搜索结果
2
{% endyoutuber %}例如
2
3
4
5
{% endyoutuber %}
{% youtuber search hexo+tag+plugin %}
{% endyoutuber %}如果您的搜索有多个关键字,请使用
+将它们连接在一起,如上所示
嵌入用户上传的视频(也称为频道)
2
{% endyoutuber %}例如
2
{% endyoutuber %}请注意,您必须提供用户名而不是频道 ID
参数
您可以以 YAML 格式指定其他参数,如下所示
2
3
4
5
6
7
8
9
10
11
12
13
14
15
16
17
18
19
20
21
22
23
24
25
26
27
allowfullscreen: yes,
autoplay: 1,
cc_lang_pref: fr,
cc_load_policy: 1,
color: white,
controls: 0,
disablekb: 1,
enablejsapi: 1,
end: 210,
frameborder: 20,
fs: 0,
height: 480,
hl: fr,
iv_load_policy: 3,
loop: 1,
modestbranding: 1,
origin: your-domain,
playlist: "videoId1,videoId2,videoId3",
playsinline: 0,
privacy_mode: yes,
rel: 1,
showinfo: 0,
start: 30,
widget_referrer: https://your-domain.com/some-page,
width: 640,
{% endyoutuber %}大多数参数可以在Youtube 文档中找到。
对于剩下的:
- 如果
width和height被指定为播放器的尺寸,它将取消该小部件的自动调整大小功能frameborder允许指定玩家周围的边缘厚度privacy_mode允许播放视频而不被谷歌跟踪(不使用cookie)allowfullscreen如果需要,让用户打开全屏模式
默认值
_config.yml上述参数可以通过文件全局指定默认值。
2
3
allowfullscreen: yes,
autoplay: 1
hexo-tag-dplayer
听歌插件,些许鸡肋。
在 Hexo 帖子/页面中嵌入 dplayer
1 | npm install hexo-tag-dplayer --save |
用法
1 | {% dplayer key=value ... %} |
钥匙可以是
1 | dplayer options: |
DPlayer 选项映射的参数:
1 | { |
请参阅 dplayer 文档以获取更多信息。
例如:
1 | {% dplayer "url=https://moeplayer.b0.upaiyun.com/dplayer/hikarunara.mp4" "addition=https://dplayer.daoapp.io/bilibili?aid=4157142" "api=https://api.prprpr.me/dplayer/" "pic=https://moeplayer.b0.upaiyun.com/dplayer/hikarunara.jpg" "id=9E2E3368B56CDBB4" "loop=yes" "theme=#FADFA3" "autoplay=false" "token=tokendemo" %} |
兼容 PJAX
1 | $(document).on('pjax:start', function () { |
定制化
您可以根据博客的目录结构修改变量scriptDir(默认:“/assets/js/”)和styleDir(默认:“/assets/css/”) 。index.js
或者只使用 _config.yml 配置:
1 | # on _config.yml of hexo-site |
问题
如果出现任何问题,请通过问题告诉我,使用如下所示的 hexo raw 标签来使用 dplayer:
1 | {% raw %} |
使用详情请参见DPlayer
hexo-tag-aplayer
听歌插件,些许鸡肋。
在 Hexo 帖子/页面中嵌入播放器
- APlayer.js >= 1.10.0
- Meting.js >= 1.2.0
1 | npm install --save hexo-tag-aplayer |
用法
选项
title: 音乐标题author: 音乐作者url: 音乐文件地址picture_url:可选,音乐图片urlnarrow:可选,窄型autoplay:可选,自动播放音乐,手机浏览器不支持width:xxx:可选,前缀width:,玩家宽度(默认:100%)lrc:xxx:可选,前缀lrc:,LRC文件url启用后期资源文件夹后,您可以轻松地将图像、音乐和 LRC 文件放入资源文件夹中,并像这样引用它们:
带歌词
除了“lrc”选项外,您还可以使用
aplayerlrc带有结束标记的选项来显示歌词。
2
3
[00:00.00]lrc here
{% endaplayerlrc %}
带播放列表
2
3
4
5
6
7
8
9
10
11
12
13
14
15
16
17
18
19
20
21
22
23
24
25
26
27
{
"narrow": false, // Optional, narrow style
"autoplay": true, // Optional, autoplay song(s), not supported by mobile browsers
"mode": "random", // Optional, play mode, can be `random` `single` `circulation`(loop) `order`(no loop), default: `circulation`
"showlrc": 3, // Optional, show lrc, can be 1, 2, 3
"mutex": true, // Optional, pause other players when this player playing
"theme": "#e6d0b2", // Optional, theme color, default: #b7daff
"preload": "metadata", // Optional, the way to load music, can be 'none' 'metadata' 'auto', default: 'auto'
"listmaxheight": "513px", // Optional, max height of play list
"music": [
{
"title": "CoCo",
"author": "Jeff Williams",
"url": "caffeine.mp3",
"pic": "caffeine.jpeg",
"lrc": "caffeine.txt"
},
{
"title": "アイロニ",
"author": "鹿乃",
"url": "irony.mp3",
"pic": "irony.jpg"
}
]
}
{% endaplayerlist %}
详细配置参考:
https://github.com/MoePlayer/hexo-tag-aplayer?tab=readme-ov-file#meingjs-support-new-in-30
hexo-lunar-calendar
不知道怎么用,说明不详。
📅 hexo 的农历。
1 | npm i hexo-lunar-calendar |
1 | <%= dateLunar(date(post.date)) %> |
hexo-butterfly-categories-card
有些鸡肋,功能不多。
给hexo-theme-butterfly添加 [首页分类卡片],基于 hexo-butterfly-categories-card 插件修复
安装插件,在博客根目录[Blogroot]下打开终端,运行以下指令:
1 | npm install hexo-butterfly-categories-card --save |
添加配置信息,以下为写法示例 在站点配置文件_config.yml或者主题配置文件_config.butterfly.yml中添加
1 | # hexo-butterfly-categories-card-gabriel |
参数释义
| 参数 | 备选值/类型 | 释义 |
|---|---|---|
| priority | number | 【可选】过滤器优先级,数值越小,执行越早,默认为10,选填 |
| enable | true/false | 【必选】控制开关 |
| enable_page | path/all | 【可选】填写想要应用的页面的相对路径(即路由地址),如根目录就填’/‘,分类页面就填’/categories/‘。若要应用于所有页面,就填’all’,默认为’/‘ |
| layout.type | id/class | 【可选】挂载容器类型,填写id或class,不填则默认为id |
| layout.name | text | 【必选】挂载容器名称 |
| layout.index | 0和正整数 | 【可选】前提是layout.type为class,因为同一页面可能有多个class,此项用来确认究竟排在第几个顺位 |
| column | odd/even | 【可选】显示列数,考虑到比例问题,只提供3列和4列,odd为3列, even为4列 |
| row | number | 【可选】显示行数,默认两行,超过行数切换为滚动显示 |
| message.name | text | 分类名称,需要和你自己的文章分类一一对应。 |
| message.descr | text | 分类描述,需要和你自己的文章分类一一对应。 |
| message.cover | url | 分类背景,需要和你自己的文章分类一一对应。 |
| custom_css | url | 【可选】自定义样式,会替换默认的css链接,可以下载文档给出的cdn链接后自主修改 |
 wechat
- alipay